3 Cardiac Diagnostic Stress Testing
Introduction
The types and variations of cardiac conditions are almost endless and are too extensive to list here. However, for the exercise science professional working in cardiac rehabilitation, there will be several common cardiac conditions that patients will most frequently present. Each condition presents challenges in the treatment plan, patient monitoring and conditioning programs. Diagnostic tests are used to evaluate the function of the heart and circulation, as well as intervention techniques used to restore blood flow to the heart.
The cardiovascular system encompasses the heart muscle, atrial and ventricular chambers valve structures, blood vessels, and lungs. Disease may manifest in any number of these areas, making detection a bit tricky. There is no one test that can identify where cardiovascular disease is occurring. The clinician must take a careful history of the patient, recognize symptoms, and risk factors, and then select a diagnostic test that may provide the best chance of identifying the condition.
Diagnostic tests differ by their technology as well as the aspect of the system where they provide the best information. This chapter describes the most used diagnostic techniques that the exercise science professional will experience in their day-to-day work.
Evaluating the Work of the Heart: the Graded Exercise Test (GXT)
“Work of the Heart” Concept – It can be a bit confusing when we talk about work of the heart. We tend to think of the body doing work (muscles, aerobic system) and of course that is true. However, the heart is a unique muscle, because it gets its oxygen via coronary arteries, and any restriction in flow to the heart will specifically affect its ability to function. Work of the heart consists of two factors: pressure generation and contraction of the ventricles and the rate of ventricular contraction. Myocardial oxygen use is linked to these variables, and we can assess them by measuring heart rate and systolic blood pressure.
Purpose of a GXT
If you were about to buy a car, you would do a test drive, right? Not only a gentle drive along the street, but maybe out on the highway and at higher speeds to see how it handles. Maybe the wheels wobble at high speed (like my car did in college) but you would not have detected it driving at slow speeds.
A Graded Exercise Test (GXT) is a means of providing increasing work challenges to the heart. Assessing the heart while at rest may not reveal underlying heart issues, such as occluded arteries or weakened heart muscle.
Why test? Indications for Testing
- Diagnostic
This means we are trying to use the exercise test along with other heart imaging techniques to identify any disease that may be present, or any abnormal physiological response that might lead the physician to a diagnosis.
- Prognostic
It is known that very low fitness (i.e. 5 MET capacity or lower) is not a good prognosis for someone hoping to avoid heart disease. Fitness matters! A GXT can help identify the individual response and compared to fitness norms as well as other norms of response (i.e. heart rate, blood pressure)
- Following progress, improvement with disease management.
Cardiac rehab can provide fitness training, improved responses to physical demands, lowered blood pressure, and symptom management. Repeat GXT evaluations at the beginning and towards the end of cardiac rehab can provide feedback on progress and improvement in the patient. This can provide confidence to the patient and inform the physicians as to patient management and care. Maybe it is assessing a pacemaker function? New medications for blood pressure? Control of arrhythmias? There should be a “why” associated with the test.
When might you NOT test? Contraindications
Exercise testing does come with risks. There may be situations where you would still want to perform a test because the value of the test outweighs the risk. However, testing would ONLY be done in a clinical environment with all safety personnel and procedures in place. There are Relative Contraindications. Some examples include (source ACSM Guidelines 11th ed. P. 116):
- – Resting systolic > 200 mmHg of diastolic >110mmHg
- – Uncontrolled accelerated rhythm (“tachyarrhythmia”, afib, Vtach, SVT..)
- – AV block (second, third degree)
- – Mental impairment with limited ability to cooperate.
- – Recent stroke of transient ischemic attack
In other situations, you simply would not test, because the condition carries a risk that exceeds any benefit of a GXT. These are call Absolute Contraindications, and include (source ACSM Guidelines):
- – Acute MI within 2 days (heart is still healing!)
- – Ongoing unstable angina (get this under control first!)
- – Uncontrolled arrhythmia and hemodynamic instability (get arrhythmia and BP under control first)
- – Active endocarditis, myocarditis, pericarditis
- – Physical disability that precludes testing
Common Graded Exercise Test Protocols
Why have a Variety of Protocols?
To effectively evaluate the physiologic response to increasing levels of work, we need to assess the patient response while they are at a steady state. Achieving a steady state during exercise is dependent upon the fitness of the subject relative to the increase in workrate (MET increments). For more fit people, they can tolerate larger increases in workrate and achieve steady state quickly. For very unfit individuals smaller workrate increments are needed, and more time to attain a steady state. Additionally, electrocardiograph tracings are difficult to obtain if the patient is running, so protocols are designed to keep the patient at a walking pace. You will notice that treadmill grade is used along with small increases in speed. To obtain the highest MET performance, protocols that use walking uphill induce the greatest muscle mass and can therefore stress the physiologic system the most. Cycle protocols, which use 5-20% less muscle mass, result in lower peak MET performance, and will also induce more local leg fatigue. In some cases, for individuals who cannot exercise, the heart can be stressed via pharmacologic stress tests, which will be discussed later.
Commonly Used Protocols
Standard Bruce Protocol (3 minutes per stage)
|
Stage |
Speed (mph) |
Grade (%) |
METS |
|
1 |
1.7 |
10 |
5 |
|
2 |
2.5 |
12 |
7 |
|
3 |
3.4 |
14 |
10 |
|
4 |
4.2 |
16 |
13 |
|
5 |
5.0 |
18 |
15 |
Naughton Protocol (2 minute stages)
|
Stage |
Speed (mph) |
Grade (%) |
METS |
|
1 |
1.0 |
0 |
1.8 |
|
2 |
2.0 |
0 |
2.5 |
|
3 |
2.0 |
3.5 |
3.4 |
|
4 |
2.0 |
7.0 |
4.4 |
|
5 |
2.0 |
10.5 |
5.4 |
|
6 |
2 |
14.0 |
6.4 |
Modified Bruce ( 3 minute stages- often used with low level GXT)
|
Stage |
Speed (mph) |
Grade (%) |
METS |
|
1 |
1.7 |
0 |
2.9 |
|
2 |
1.7 |
5 |
3.7 |
|
3 |
1.7 |
10 |
5 |
|
4 |
2.5 |
12 |
7 |
Performing the Graded Exercise test
The exercise test technician conducting the GXT needs skill in proper electrode placement, providing accurate test instructions, and accurate collecting of physiologic and perceptual data from the patient. ECG electrodes provide multiple views of the heart’s electrical activity, and these views would change if electrodes were not placed in a consistent manner. Therefore, the skeletal frame is used to help us locate the proper position of electrodes.
Preparation of the skin
Prior to electrode placement, the skin must be prepared by abrading the skin with a rough pad that removes dead skin and body oils. Then the area is cleaned with a cotton pad and alcohol. In some cases, the area must first be shaved, since body hair will interfere with electrode contact.
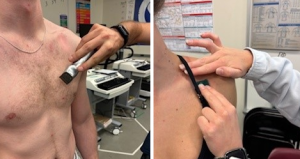
ECG electrode application
It is important that the ECG electrodes are placed in a similar location for each stress test. Think of electrodes like cameras, taking photos of the heart from various angles. If you do not have consistent electrode placement, then the views are not consistent, making diagnostic interpretation more difficult.
Limb Lead Electrodes
For resting ECGs, the limb electrodes are normally placed on the limbs (arms and legs). However, in diagnostic stress testing this is not possible, since the individuals will be using the limbs for movement. So, these electrodes are moved onto the torso and just off the limbs.
Right Arm (RA) – Palpate to identify the infraclavicular fossa. This is a depression just inferior to the clavicle and medial to the deltoid. Place the electrode in this location to help reduce artifact due to arm motion.
Left Arm (LA) – Use the same procedure to identify the infraclavicular fossa on the left side of the body.
Right Leg (RL) – Place the electrode inferior to the ribs and superior to the iliac on the right side of the torso.
Left Leg (LL) – Place the electrode inferior to the ribs and superior to the iliac on the left side of the torso.
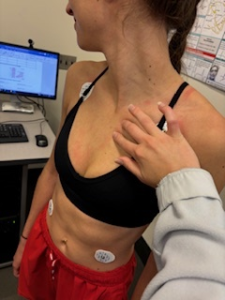
Precordial or Chest Lead Electrodes
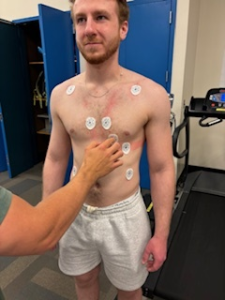
The chest leads provide electrical recordings for the transverse place of the heart, from anterior to lateral views. The electrodes are placed on the left side of the chest encompassing the heart.
Palpating intercostals– This will be a skill to develop and practice. It requires a light touch, while staying close to the side of the sternum. Use the pads of your fingers. Locate the first intercostal, then count each space until you find the fourth.
Lead V1 Placement: Place the electrode in the fourth intercostal space just to the right of the sternum. Don’t stray far from the side of the sternum so you avoid picking up muscle artifact from the pectoral muscle.
Lead V2 Placement: Place the electrode in the fourth intercostal space just to the left of the sternum. This should be directly across from V1.
Lead V3 Placement: You will need to find V4 first. Then you will place V3 at the midpoint between V2 and V4. Follow the contours of the chest for a “straight” line( a bit of a curve with body contours).
Lead V4 Placement: Place the electrode in the fifth intercostal space at the midclavicular line. The fifth intercoastal should be just below the pectoral muscle and you will have to find the horizontal line of the midclavicular to identify the location.
Lead V5 Placement: Place the electrode on the anterior axillary line (vertical guide) and the same level as V4 (horizontal guide).
Lead V6 Placement: Place the electrode on the mid axillary line (vertical guide) and the same level as V4 (horizontal guide)
Performing the diagnostic stress test
It is important to understand that many individuals have never been on a treadmill, so anxiety and gait issues may occur, so you care of the patient can help ensure a safe and effective stress test.
Preparing the patient- explanations
The more you can make the patient aware of what they will experience during the test
- Stage assessments
- Perceptual scales used to assess patient stress (RPE, angina, dyspnea, claudication..)
Mounting the treadmill- handrail support
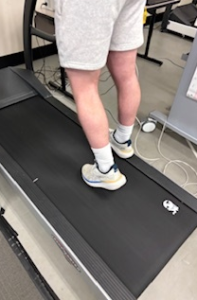
Assume patients are not used to a treadmill and not too stable walking on a treadmill. Some may not have even been on a treadmill before! To them, stepping on a moving treadmill is like getting on an escalator (scary!). Have them hold the handrails and trace the belt with one foot to get used to the speed. Start them slow (1.7mph maybe?). As they trace the belt, they can add more weight until they feel ready to step on the belt. Spot them and help them relax walking on the belt. Handrails are support, not a crutch to grip tightly.
RPE instructions
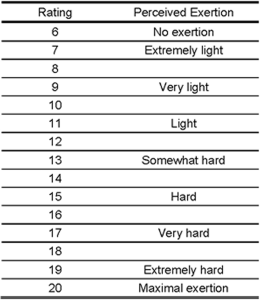
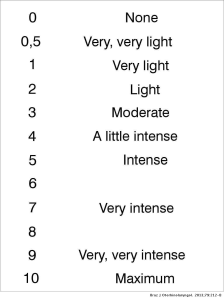
Not many people are familiar with the concept of self-monitoring their exercise intensity. The purpose of the perceived exertion scales is to cue to exerciser as to the internal sensations of physical effort, stress and fatigue. They need to take account of the sensory cues of effort and try to quantify their overall sense of effort. The original scale was developed by Gunnar Borg in 1962. It is a 15 graded category scale moving from 6 to 20. Initial thoughts on the development of the scale were to link the rating to heart rate (such that the lowest rating of 6 would link to a resting heart rate of 60 and a maximal rating of 20 would link to a maximal heart rate of 200). While this level of precision is not possible, the scale remained 6-20. Subsequent exertion scales are 0 to 10 scales. These scales are used during exercise testing to evaluate exertion as the test progresses and can also be used for exercise prescription during steady state exercise.
During the exercise test stages: measurements
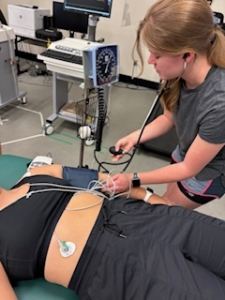
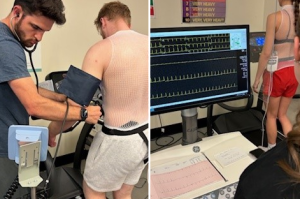
Regardless of the type of protocol, the desire is to obtain all measurements when the patient is at a steady state. During the 3-minute Bruce protocol stages, measurements typically begin at minute 2. The practitioner has 30-40 seconds to obtain the following:
- Exercise Blood pressure
- Rating of Perceived Exertion
- 12 lead electrocardiogram
- The practitioner should also use the opportunity to observe the patient for any symptoms of undue stress, pain or other symptoms of exercise intolerance.
- If time permits, providing the patient some information on the next stage (speed, grade change) is helpful.
Indications for terminating the test
The reasons for stopping an exercise test can vary, both based on the particular patient conditions and perhaps even the purpose of the stress test. In some cases, absolute indicators require that the test be stopped immediately, whereas relative indicators
Indications for terminating the GXT include (source ACSM Guidelines 11th ed. P. 125):
Absolute Indications
- Drop in systolic blood pressure >10mmHg despite the workrate increasing, when accompanied by evidence of ischemia
- Moderate to severe angina
- Signs of poor perfusion (cyanosis, pallor)
- The individual requests to stop
Relative Indications
- Marked ST segment displacement (> 2mm)
- Drop in systolic blood pressure >10mmHg despite the workrate increasing, in the absence of ischemia
- Increasing chest pain
- Exaggerated hypertensive response (SBP > 250mmHg or DBP > 115mmHg)
- Arrhythmias other than sustained Vtach, including multifocal ectopy, ventricular triplets, SVT, bradyarrhythmia’s that may become more complex or compromise hemodynamic stability
Recovery /Cool Down: a very important part of the test!
I might be easy to lower your guard during the recovery phase of the stress test, thinking that the highest risk for the patient has passed. However, transitioning back to rest can be difficult. The sudden drop in intensity can cause a loss of venous return and a sudden drop in blood pressure. Maintenance of venous return is imperative. Venous return can be maintained by utilizing the venous muscle pump, by way of walking during the cool down. Do NOT let them stand still! Loss of venous return can result in drop in blood pressure and produce symptoms of dizziness and could contribute to a fall. Arrhythmias may also be present, so blood pressure, ECG and patient symptoms need to be monitored throughout recovery. Typically, measures are obtained every 1-2 minutes during recovery, but may vary based on the patient’s response.
Pharmacologic Stress Testing- a NON-Exercise Stress Test
What if the patient simply cannot exercise? With so many patients suffering from obesity, diabetes, chronic limb ischemia (perhaps even amputations) as well as a range of neuromuscular conditions, it may not be safe to use exercise to stress the heart. So how can we cause increases in heart rate and blood pressure? Drugs! Pharmacologic stress testing is a protocol of drug administration that accelerates the heart rate, increases systolic blood pressure, and induces coronary vasodilation similar to that seen during exercise. The patient can remain seated or supine while the drugs are administered, and the heart specifically is given the stress. The same monitoring equipment is used, and good diagnostic quality is still provided.
Drugs Commonly Used in Pharmacologic Testing
Dobutamine
Dobutamine is a beta-1 agonist drug that directly affects the heart rate and systolic blood pressure by increasing it based on the dosage size. Dosing can be given in series to evaluate increasing levels of work of the heart during exercise.
Lexiscan, Adenosine
Lexiscan and adenosine are medications that cause coronary vasodilation. This is an effect seen during regular exercise but must be induced during a pharmacologic stress test. Healthy coronary arteries will dilate, but atherosclerotic arteries will resist dilation, and areas of reduced coronary flow may be detected using other imaging techniques (thallium scan, echocardiogram)
Selected Sources
Marriott’s Practical Electrocardiography. 13th ed.Strauss, D,G and Schocken, D.D. Wolters Kluwer Pub. 2021.
Goldberger’s Clinical Electrocardiography: A simplified approach 10th ed. Goldberger A., Goldberger, Z, Shvilkin A. Elsevier pub. ISBN-10 0323824757 2023.
Clinical Exercise Electrocardiography – Levine S., Coyne B., Colvin L. Jones & Bartlett Learning Pub. ISBN-10 1284034208 2015.
Metabolic Equivalent. A term used to describe metabolism and oxygen consumption by a huma. I MET equals 3.5 ml/kg/min of oxygen use. The cost of activities can be quantified by how many METs is required to perform the activity or exercise intensity.
An abnormality of the heart in rhythm or rate. Synonymous with dysrhythmia
A relative contraindication refers to a situation or condition where a particular treatment, procedure, or intervention may be considered risky or less favorable compared to alternative options, but it could still be used under certain circumstances if the potential benefits outweigh the risks.
A term that refers to a specific situation or condition in which a particular treatment, procedure, or intervention should not be used under any circumstances due to the high risk of harm to the patient.
The study of the pressure and flow of the blood in the body.
Between the ribs in the chest wall. Placement of ECG electrodes that use boney landmarks also use intercostal spaces as locations for electrode placement. For example, V4 is placed at the midclavicular line and 5th intercostal space.
Signs or circumstances that suggests a course of action should be taken. Term used in drug referencing to identify a particular use of a medication. For example, a beta blocker is indicated for the treatment of hypertension and angina. Or in stress testing perhaps chest pain is an indication for stopping the test.
Refers to the blood returning to the heart (right atrium) from the venous circulation. Venous return can be influenced by posture, the skeletal muscle pump, and the respiratory pump.
Inadequate blood (and therefore oxygen) supply to a tissue. A narrowed or blocked coronary artery results in reduced blood flow to an area of the heart, resulting in reduced oxygen availability.
