9 12 Lead Electrocardiogram Assessment
The three-dimensional view of the heart
If you think of the heart as a big electrical lightbulb, with electricity emanating in all directions, you may be able to see how placement of electrodes across the chest can offer us a range of views of the electrical signal. Much of 12 lead ECG interpretation is taking measurements of wave magnitude as well as the timing/duration of wave events. Take out a sharp pencil and some sharp eyes!
Basic waveform
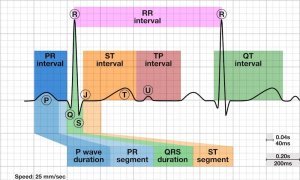
Remember that the ECG paper has small boxes that are 1mm (0.1mv) in magnitude and 0.04 seconds in duration. So, by counting small boxes and converting to both magnitude and time, we can measure the characteristics of the cardiac cycle.
Rules of ECG waves
The ECG only graphs a voltage magnitude while the paper moves by, so what governs up or down in a lead? The electrical wave emanating from the heart will either travel towards the positive pole of the electrode, away or at an angle. So, the rules are:
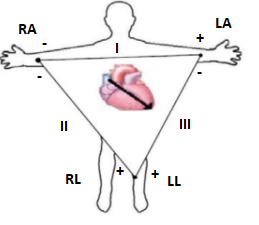
- A wave moving towards the positive pole of the lead will make positive deflection (upright wave)
- A wave moving away from the positive pole of the lead will make a negative deflection (upside down wave)
- A wave moving perpendicular (at a right angle) to the positive pole of the lead will make a biphasic (up and down) or flat wave.
Einthoven’s Triangle I, II, III. The original three leads. Frontal Plane View
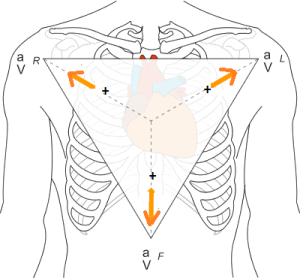
Augmented leads: 3 more frontal plane views
With the advent of hardware and computer technology. Additional views were made possible by creating a null point at the center of the triangle and then measuring the voltages emanating to a point between each of the three leads. These “unipolar” (just one end has a charge) leads are known as the “augmented Voltage Leads”, and angle towards the right (aVR), left (aVL) and foot (aVF). This provides some added resolution of views, giving us 6 different leads, despite only using 4 electrodes!
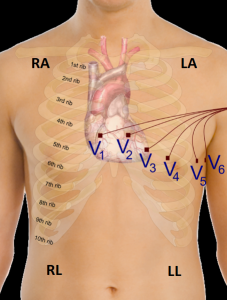
Precordial Leads or Chest Leads, or “V” leads. Transverse plane view wrapping around the heart
With the addition of 6 more unipolar leads across the chest, the complete 12 leads are created. The precordial, or chest leads are placed at specific points across the chest (see chapter 3 for information electrode placement). All the electrodes are the positive pole of the circuit, so as the electrical depolarization wave travels out from the body, it may be traveling away from lead V1 (so V1 may be upside down) but traveling directly towards V5 (so it may be upright). So, you will see a range of looks to the ECG as you scan across V1 through V6.
“Geography” of the 12 lead ECG
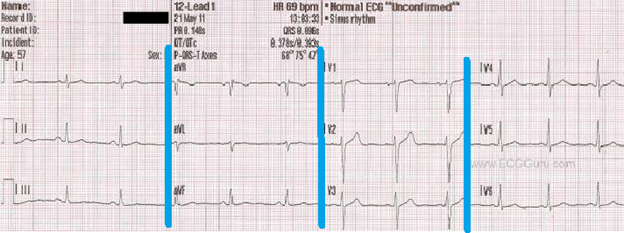
When you first look at a 12 lead ECG it can be a bit confusing. So many different looking waves. The first electrocardiographs were machines that rolled paper out and printed 3 leads at a time, before switching to the next 3 leads, and so on until all 12 leads were printed. This convention still holds for today, despite digital technology. So, if you look at the 12 Lead from left to right you will see Leads I, II and II are printed first. Keep in mind that the heart rhythm is continuous, so the first cardiac cycle you see in Lead I is the SAME cycle in lead II and II. It is just a view from a different perspective. The blue lines in the figure represent the switch to the next 3 leads (aVR, aVL, aVF) followed by the V leads. You may notice in some leads, waves are upside down, in others the P wave may be difficult to see and some measurements we take may be difficult. Most often, Lead II is the clearest lead to use for many of the measurements you will learn in this chapter. This is because lead II is essentially the sum of lead I + II, so it gives us the largest waves to assess. However, it may be the case that lead II is difficult to see. In that situation, simply use another lead.
Location of heart according to ECG lead
Based on the positioning of the leads, we can obtain a three-dimensional view of the heart. If there is an issue in a particular aspect of the heart, it may only show up on the ECG in the leads that are facing that aspect. As such, we can gain information on the anatomy affected when a particular lead is indicating an issue. See the table below, it will come in handy!
Table 1. Heart Locations According to Leads
| MI | Leads | Artery | Side of Heart |
| Inferior | II, III, aVF | Right Coronary | Right |
| Septal | V1, V2 | LAD | Left |
| Anterior | V3, V4 | LAD | Left |
| Lateral | I, aVL, V5, V6 | Left Circumflex | Left |
13 Points of Analysis of the 12 lead
These steps by themselves do not interpret the ECG, however they function as a checklist of measure to help determine anomalies with the ECG. Not all ECG anomalies can be determined, but these are the basic starting point of an otherwise extensive and complex process of interpretation. Let’s get our foundation started!
- Standardization. The ECG must be properly calibrated to that measures of magnitude (height) are accurate. Standardization is set at 10mm (10 small boxes or 2 large boxes). Paper speed is set at 25mm/s (1500mm/min)

2. Heart Rate. There will actually be two heart rates to calculate. Atrial rate will be calculated using p waves and ventricular rate using the QRS complex. Try measuring in a lead where the p wave is more easily seen (i.e lead II). Often the 12 lead will provide a Lead II rhythm strip across the bottom of the ECG for this measure. For now, just use the figure above.
Atrial rate = ______ Ventricular Rate = _________
3. Rhythm. Determine whether it is a sinus rhythm (sinus bradycardia, NSR, sinus tach) or whether there is another type of rhythm present. Is there a p wave for every QRS? Are there more? Are they missing? Again, use the figure above.
Is it: Sinus Bradycardia Normal sinus Rhythm Sinus Tachycardia
4. PR Interval. Measure the time from the beginning of the p wave to the beginning of the QRS. 0.12 – 0.20s is normal. (remember each small box is 0.04 sec so the interval should be 3-5 boxes). Time in seconds

PR interval = (#boxes x .04= ______s)
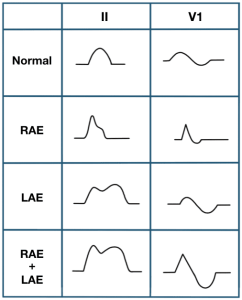
5. P wave size. Normally the P wave should not exceed 2.5mm in height and is usually less than 3 mm (.12s) wide in all leads. Tall or peaked P waves may be a sign of right atrial enlargement (RAE). Wide P waves may indicate left atrial enlargement (LAE). Height in mm, Time in seconds

P wave height _____mm P wave duration ________s
6. QRS width. Measure from the onset of the wave (in some cases there may not be a q wave, so from where the complex begins). Normally the QRS wave is 0.1 sec (2.5 boxes) or less in all leads. Time in seconds
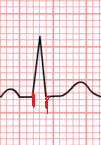
In figure 10, measure from the beginning of the QRS to the end. In this example, the width is 2 small boxes, so 2 x 0.04= 0.08seconds.
QRS interval = _____________s
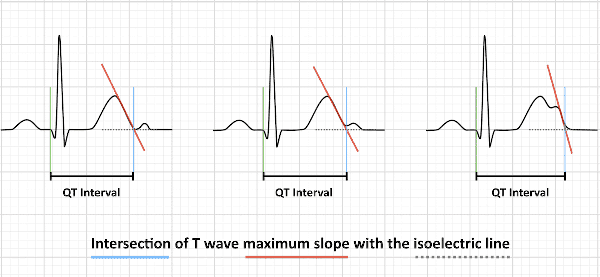
7. QT interval. a measure of the time between the start of the Q wave (or onset of complex) and the end of the T wave. In general, the QT interval represents electrical depolarization and repolarization of the left and right ventricles. A lengthened QT interval is a biomarker for ventricular arrhythmia risk. Normal intervals are dependent upon heart rate: Time in seconds.
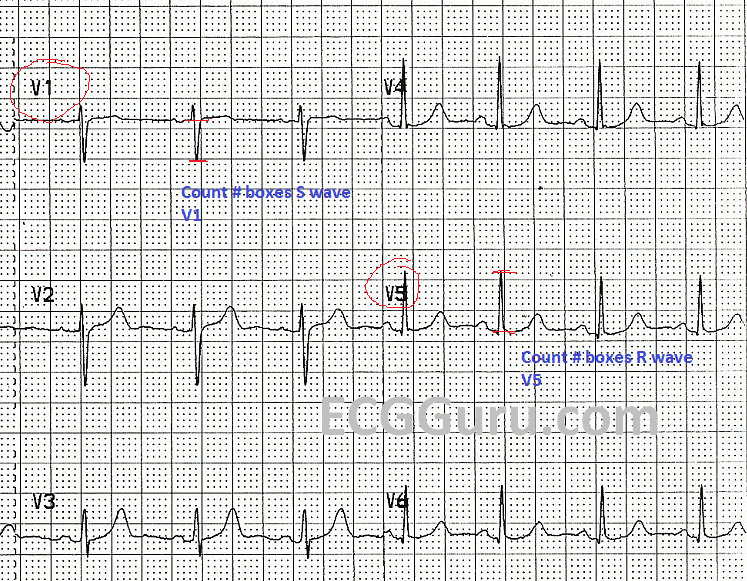
8. QRS Voltage.
The size of the heart muscle will influence the size or magnitude of the QRS complex. This means that both an athletic heart as well as a diseased heart could show large QRS voltage. Voltage can also be influenced by the amount of body fat (thin vs fat).
-
- Measure QRS voltage (in mm) S wave in V1 + R wave in V5
- Draw horizontal line at the PR interval and measure to end of wave
- Less than 35mm total is normal
- > 35mm indicative of left ventricular hypertrophy
- Measure QRS voltage (in mm) S wave in V1 + R wave in V5
9. QRS Electrical Axis. Determining the direction of the primary wave of ventricular depolarization is done using the limb leads. Note the positive and negative poles of the leads and the degrees of the axis.
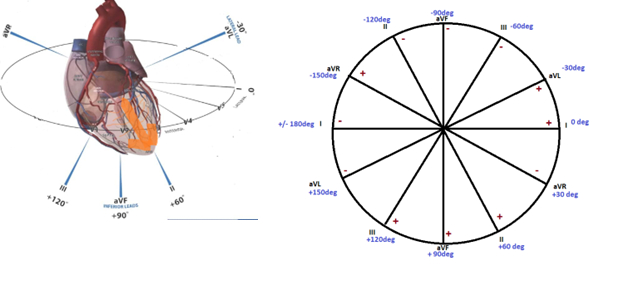
Steps to determine axis:
- Using only Leads I,II,II and aVR, aVL and aVF, find the smallest and most equiphasic lead,
- Identify the lead perpendicular, then is that perpendicular lead’s QRS upright or upside down?
- Using grid identify degrees for the depolarization wave
Lets try one:
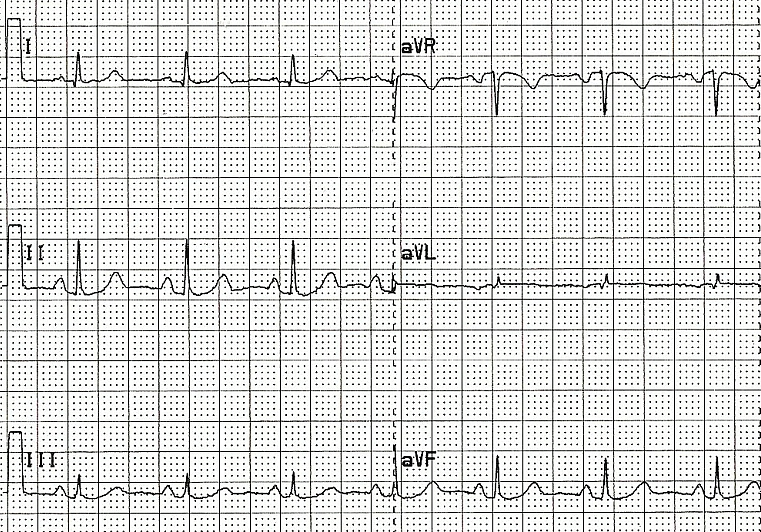
- Looking only at leads I,II,II, aVR,aVL, aVF (in figure 14), find the smallest and most equiphasic lead. Pick the best answer.
- Looking at the axis grid (figure 13, right image) find the lead that is perpendicular to the smallest and most equiphasic lead. Note the positive and negative poles of the lead
- Look at the perpendicular lead on the ECG above. Is the QRS upright (moving to positive pole) or negative?
- Identify degrees on the grid associated with the pole that the lead is moving towards.
Did you get +60 degrees?
10. R Wave progression. Examine the chest leads only, with leads V1-V3 facing away from the primary depolarization wave (so small r but large S wave), while V5-V6 face the path of the wave. Therefore, early V leads should be QRS inverted. Normally there should be a transition from inverted QRS complexes to a transition in V3-V4 after largest R wave, next lead is typically smaller.
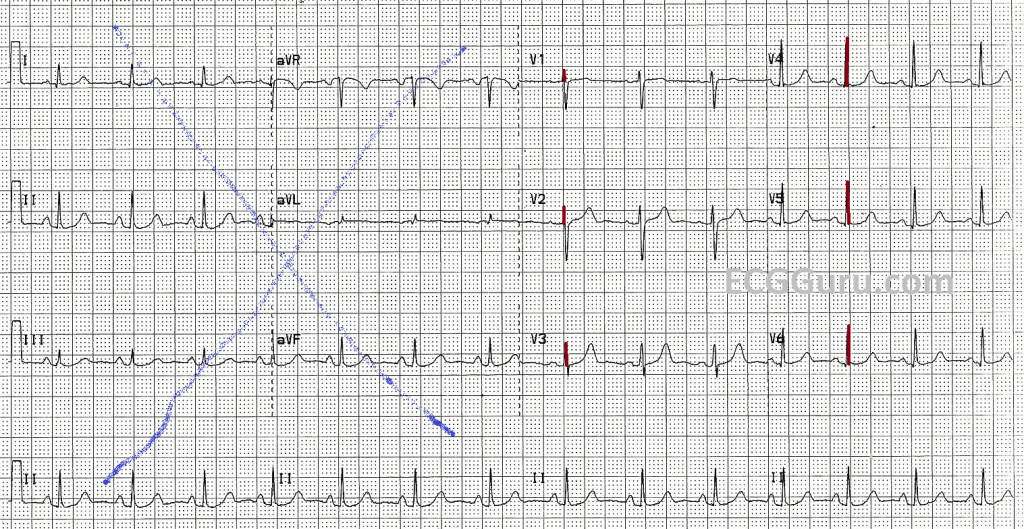
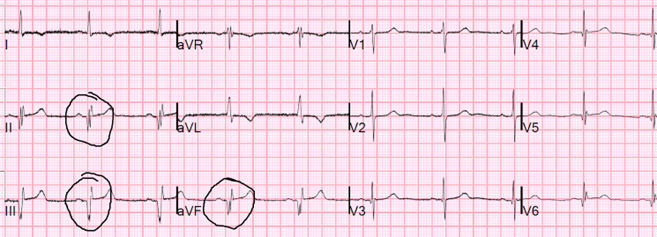
11. Q waves. Normally, Q waves are so small that one can barely measure the width or depth. Q waves that are 1/3 or more the size of the QRS complex are significant. However, Q waves are normal in leads III and aVR. Large Q waves can indicate an old (healed) myocardial infarction. In leads V1 and V2, the opposite, tall R waves would be present.

Notice how small the Q wave is above? Many leads will not even have a Q wave, while most have very small Q waves.
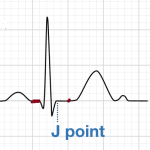
12. ST segment. The ST segment is measured from the “J” point to a point 0.08s (2 boxes) beyond. The level of this point is then compared to the level of the PR interval (the isoelectric line).
-
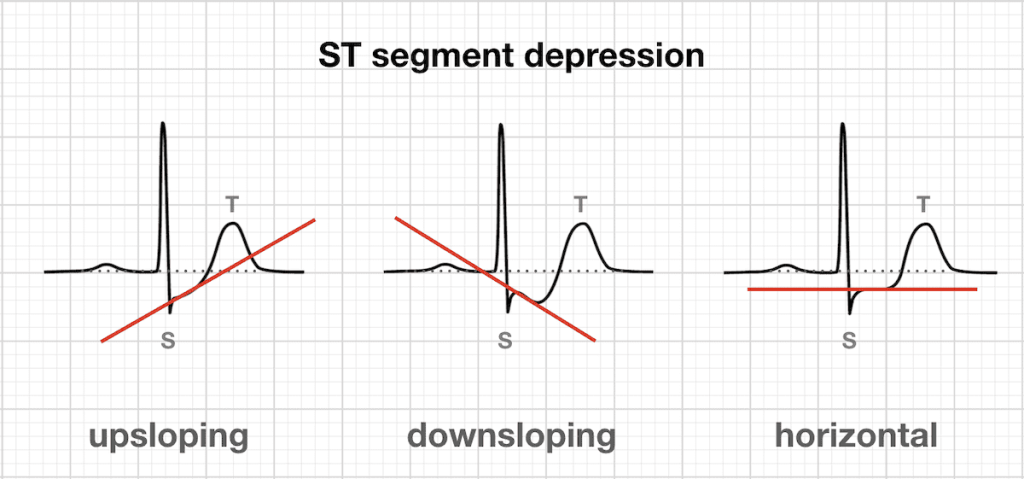
- Depression of the ST segment is indicative of ischemia
- The slope of the depression (upsloping, horizontal, down sloping) also indicates severity
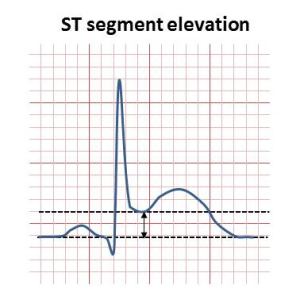
- Elevation of the ST segment is indicative of Acute Myocardial infarction, or pericarditis
13. T wave. Look in leads I, II,III, aVr, AvL, Avf only. T waves are normally upright and follow the direction of the QRS complex. In limb leads the direction of the T wave depends on the electrical axis. Abnormal T waves may be indicative of ventricular hypertrophy, ischemia, hyperventilation or even electrolyte imbalances. Identify the frontal plane leads to determine whether T waves are in the same direction as QRS.

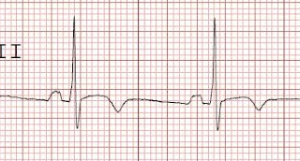
Your Turn!
Try to use the following 12 lead ECG and complete the 13 steps :
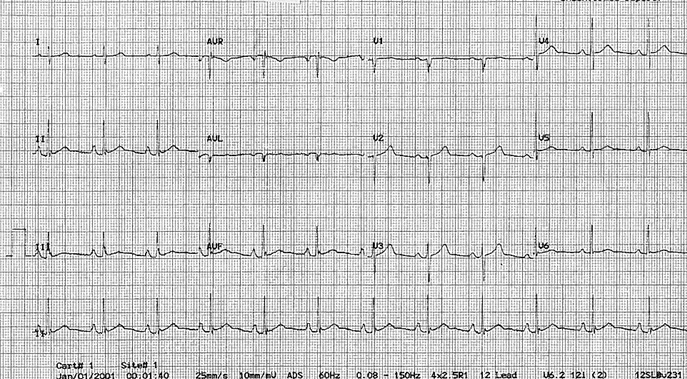
- Standardization: ____________
- Atrial rate:________ Ventricular rate:_________
- Rhythm_________________
- PR interval (in seconds):________________
- P wave height mm ________ width ___seconds
- QRS width seconds _____________
- QT interval seconds ______________
- QRS Voltage mm ___________
- QRS electrical Axis degrees ______________
- R wave progression Lead __________________
- Abnormal Q waves (if present identify leads) ___________
- ST segment (if abnormal identify leads) _____________
- T wave (if abnormal identify leads) _________________
Chapter Sources
Marriott’s Practical Electrocardiography. 13th ed.Strauss, D,G and Schocken, D.D. Wolters Kluwer Pub. 2021.
Goldberger’s Clinical Electrocardiography: A simplified approach 10th ed. Goldberger A., Goldberger, Z, Shvilkin A. Elsevier pub. ISBN-10 0323824757 2023.
Clinical Exercise Electrocardiography – Levine S., Coyne B., Colvin L. Jones & Bartlett Learning Pub. ISBN-10 1284034208 2015.
Life in the Fast Lane. https://litfl.com/ecg-exam-template/
